Jump to content

Photo

GIMP Tutorial


  • Please log in to reply
27 replies to this topic

Poll: What do you want to know about next? (37 member(s) have cast votes)

What do you want to learn about next

  1. Voted Path tool (29 votes [78.38%])

    Percentage of vote: 78.38%

  2. Rectangle/Elipse select tool (8 votes [21.62%])

    Percentage of vote: 21.62%

Vote Guests cannot vote

#1
Air Scotland

Air Scotland

    Random Scot set on destroying the earth

  • Member
  • 633 posts
Ok then as im busy this will come in dribs and drabs i will do as much as i can in one swoop if you have any questions post below this...

Step 1:
Go and get your Template
For the ease of use i will be using Jetabouts B787 kit template. simply save it and open it in GIMP.
Posted Image
You can find the template here
please note you need all three bits.


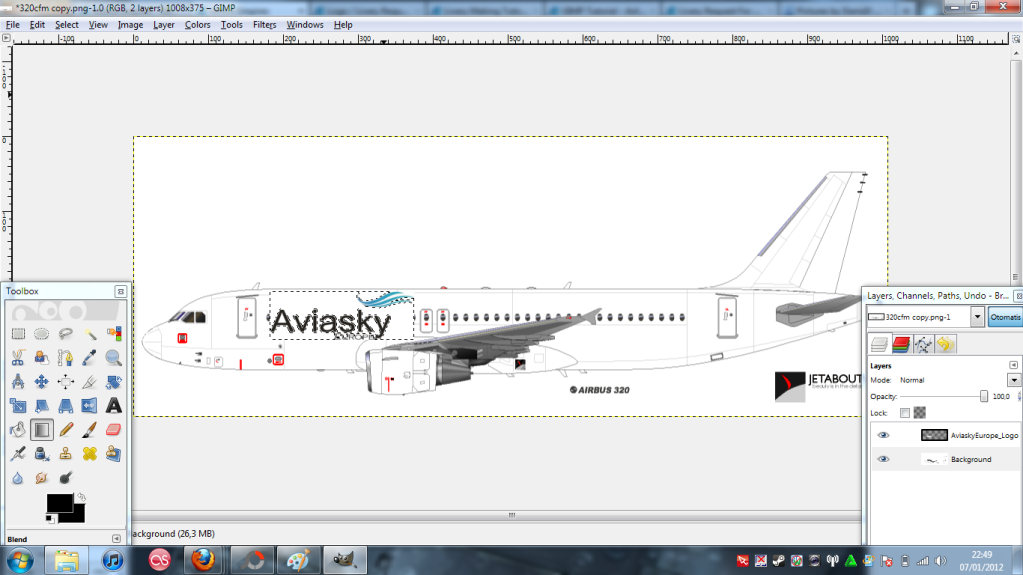
Step 2:Load the template into GIMP
it should look like this.
Posted Image

Step 3:decorate your livery in any way you want ALWAYS ONLY PLACE DECORATIONS THAT NEED DIFFERENT LAYERS IN BETWEEN THE BODY AND THE DETAILS
Ignore the white lines for now.
Posted Image

Step 4:Get rid of the white lines
Select pencil tool, lower the transparency levels of the pencil to around 90%, make pencil the same colour as the area the white lines are.
Posted Image


your livery should now look something like this*
Posted Image
*bar the decoration which will be whatever you made


Shading tutorial is comming but i dont have enough time to do it now :/

Thank you i hope you find this some use i will be adding more in depth tutorials like how to use the path tool into htis as well so dont worry all though very early beginers ;)

International Airlines Group

1950s.pngLogo.png


#2
Mr Tree

Mr Tree

    AE Addict

  • Member
  • 886 posts
I suggest this and agremeister's tutorial be pinned. Both are great resources for wanna-be designers, this one covers a more popular photo editor.

#3
littleman

littleman

    somewhat inactive

  • Member
  • 81 posts

User's Awards

3      
i agree.
boredom is fun.

#4
BritAbroad

BritAbroad

    Moderator and Data Collector

  • Data Manager
  • 1,677 posts
Motion carried. :P

Topic Pinned


sagsmall.png


#5
Air Scotland

Air Scotland

    Random Scot set on destroying the earth

  • Member
  • 633 posts
ty lets get everett to do a paint.net one as well :P

International Airlines Group

1950s.pngLogo.png


#6
Air Scotland

Air Scotland

    Random Scot set on destroying the earth

  • Member
  • 633 posts

I suggest this and agremeister's tutorial be pinned. Both are great resources for wanna-be designers, this one covers a more popular photo editor.

its an image manipulator not a photo editer though :P

International Airlines Group

1950s.pngLogo.png


#7
Air Scotland

Air Scotland

    Random Scot set on destroying the earth

  • Member
  • 633 posts
Ok now we are gonna shade the livery that we made before:

Step 1: Load up your previous livery...
(for ease of use on my own i will be using a different livery to the last one.)
Posted Image

Step 2: Create a new layer, name it fuse shine
needs to be above all other layers*
Posted Image
* if you are using a template like the B787 in the above tutorial then put it below the layer with the engines on.

Step 3: Select paintbrush tool and change the style to the largest fuzzy setting available (see image)
also change the size to 2.72*
Posted Image
*depending on the size of the template the setting needs to be higher or lower but 2.72 generaly fits most templates.

Step 4:select path tool and copy the path in the image below
Posted Image

Step 5: click stroke path and select paintbrush tool then cick stroke path.MAKE SURE YOUR FOREGROUND COLOUR IS SET TO WHITE
Posted Image

Step 6: Erase all parts of the shine that go over wings/elevators/or just overshoot the plane then lower the transparency of the layer untill it looks right.
Posted Image


your plane should now have the main shine of the body on it next time i will shot you how to put the shadow on it. :clap:Attached File  Air Scotlandshine.jpg   102.19KB   6 downloads

International Airlines Group

1950s.pngLogo.png


#8
Guest_Speed Bird_*

Guest_Speed Bird_*
  • Guests
That really isn't the best way to add light shine to an aircraft :P

#9
Air Scotland

Air Scotland

    Random Scot set on destroying the earth

  • Member
  • 633 posts

That really isn't the best way to add light shine to an aircraft :P

um SB im only trying to help them get the basics done stop showing off and help them yourself if you want <_<

International Airlines Group

1950s.pngLogo.png


#10
Air Scotland

Air Scotland

    Random Scot set on destroying the earth

  • Member
  • 633 posts
How to add shading.

Step 1: Make a new layer and call it 'Fuse Shadow'
This should be directly above the 'Fuse Shine' layer.

Step 2: Same as step 3(in the shining tutorial the one directly above)
the set up of the paintbrush is pretty much the same(just make sure you set the foreground colour to black.)

Step 3: Make the Path
Select the path tool (it is hotkeyed 'b') and copy the path in this image.
Posted Image

Step 4: Copy steps 5-6 in the shine tutorial (one directly above this)
but instead of making the foreground colour white keep it black.
Posted Image
your plane should now look something like this (in terms of shading and shining)

International Airlines Group

1950s.pngLogo.png


#11
Guest_Speed Bird_*

Guest_Speed Bird_*
  • Guests
You really don't know me very well if you think that's me showing off :P

#12
X-Wing @Aliciousness

X-Wing @Aliciousness

    I think you'll like them!

  • Member
  • 1,760 posts
  • Website:https://my.flightradar24.com/agremeister
Are you using the newest version of GIMP? It doesn't look like it to me.

UbxSbIt.png


#13
Air Scotland

Air Scotland

    Random Scot set on destroying the earth

  • Member
  • 633 posts
Adding Underwing Shadow

Step 1: Make a new layer and call it 'Shadow'
This should be just abouve the layer called 'Fuse Shine'

Step 2: Select the path tool and copy the path shown here
dont worry about your paintbrush you wont need it on this exercise.
Posted Image

Step 3: Stroke the path.
WARNING: make sure you use the correct part of the strok path area you want the stoke line area not the paintbrush bit set the width of the line to 1 pixel as shown in image.
Posted Image

Step 4: Fill the area with black.
Using the fill tool (hotkey 'CTRL+B') fill the shape that the path made with black as shown in image.
Posted Image

Step 5: repeat from step 2
although this time instead of doing the path under the elevators do it under the main wings like in image below.
Posted Image

Step 6: Lower the transparency of the 'shadow' layer
until it looks just right.
Posted Image

well done next i will do a quick one to show you how to shade the tail. :clap:

International Airlines Group

1950s.pngLogo.png


#14
Air Scotland

Air Scotland

    Random Scot set on destroying the earth

  • Member
  • 633 posts

Are you using the newest version of GIMP? It doesn't look like it to me.

whats the current one im behind i think with V2.6

International Airlines Group

1950s.pngLogo.png


#15
X-Wing @Aliciousness

X-Wing @Aliciousness

    I think you'll like them!

  • Member
  • 1,760 posts
  • Website:https://my.flightradar24.com/agremeister
Nevermind, 2.6 is the newest,

UbxSbIt.png


#16
Air Scotland

Air Scotland

    Random Scot set on destroying the earth

  • Member
  • 633 posts
may be because im using it on windows XP (work i out from how to write that emote basic not premium so screen itself looks old :P

International Airlines Group

1950s.pngLogo.png


#17
danrizt

danrizt

    New Member

  • Member
  • 2 posts
hi guys, i'm newbie on photo editing. i'm trying to make my own livery but i'm having a problem

Posted Image

here i want to put the logo (Aviasky EU) under the aircraft panel so the windows and other stuffs could be seen as well, could you advice me how? thanks before and sorry for any missed-grammar, English isn't my native language :)

#18
Air Scotland

Air Scotland

    Random Scot set on destroying the earth

  • Member
  • 633 posts

hi guys, i'm newbie on photo editing. i'm trying to make my own livery but i'm having a problem

Posted Image

here i want to put the logo (Aviasky EU) under the aircraft panel so the windows and other stuffs could be seen as well, could you advice me how? thanks before and sorry for any missed-grammar, English isn't my native language :)

Right then assuming you know how to use the program the easiest way of making the windows appear.
1) lower the transparency of the logo a little so you can see the image underneath the logo
2) select the eraser tool and, with the logos layer selected, erase the layer where the windows are.
3) increase the transparency levels back up to around 90% and there you go

Hope you understand this if not just tell me and I will make a picture tutorial of it. :)

International Airlines Group

1950s.pngLogo.png


#19
Kirkland

Kirkland

    AE King

  • Member
  • 1,504 posts
GIMP is crap, the instructions don't work

nWcLJH0.png


#20
Speed Bird

Speed Bird

    AE Addict

  • Member
  • 866 posts

User's Awards

7   

GIMP is crap, the instructions don't work


Clearly you're doing something wrong then aren't you...


0 user(s) are reading this topic

0 members, 0 guests, 0 anonymous users